Ultimate Guide To Roof Storm Damage Repair
Josh Bosley • June 23, 2025
The skies over Colorado can change from blue to menacing in a matter of minutes. One moment, your home feels protected; the next, it’s facing a barrage of hail, relentless winds, or torrents of rain. For homeowners across Denver and Northern Colorado, these wild swings in weather aren’t just an inconvenience—they’re a direct threat to the integrity of your roof and, by extension, the safety of your entire home. When a storm strikes, knowing what to do next can make all the difference between a quick recovery and months of stress.
Restoring your roof after a storm isn’t just about patching up what’s visible. It’s a process that starts with recognizing subtle signs of damage, safeguarding your family, and documenting everything for insurance purposes. From there, it’s about making smart choices—whether that means a quick temporary fix, a full replacement, or investing in storm-resistant materials for lasting peace of mind.
This comprehensive guide walks you through every critical step, from spotting hidden damage and navigating insurance claims, to selecting a reputable contractor and choosing materials built to withstand Colorado’s toughest weather. Whether you’re facing a minor leak or major structural damage, you’ll find practical advice and clear checklists to help you protect your investment and restore your home with confidence.
Ready to take charge of your home’s resilience? Let’s get started.
Identify and Understand Common Roof Storm Damage Types
Colorado’s storms come in many flavors—howling winds, golf-ball hail, sudden deluges, ice buildup, and flying debris—all of which leave distinct signatures on your roof. Knowing what each element does helps you pinpoint hidden damage before it spirals into a major repair. In this section, we’ll outline the four most common storm-related threats, show you the telltale signs, and explain why early detection matters.
Wind Damage and Its Effects
Even winds that fall short of hurricane strength can pry up shingles. Meteorologists classify gale-force winds at 39–54 mph and hurricane-force winds at 74 mph or greater; both can undermine the seal between shingles and break the bond of the underlayment. Look for:
- Curled or lifted shingle edges
- Missing tabs or whole shingles gone
- Cracked sealant around vents, chimneys, and flashing
- Granule loss that exposes the black matting underneath
Inspect your roof after any high-wind event. A few blown-off granules in your gutters or a single shingle peeled back can quickly escalate into water intrusion and deck rot.
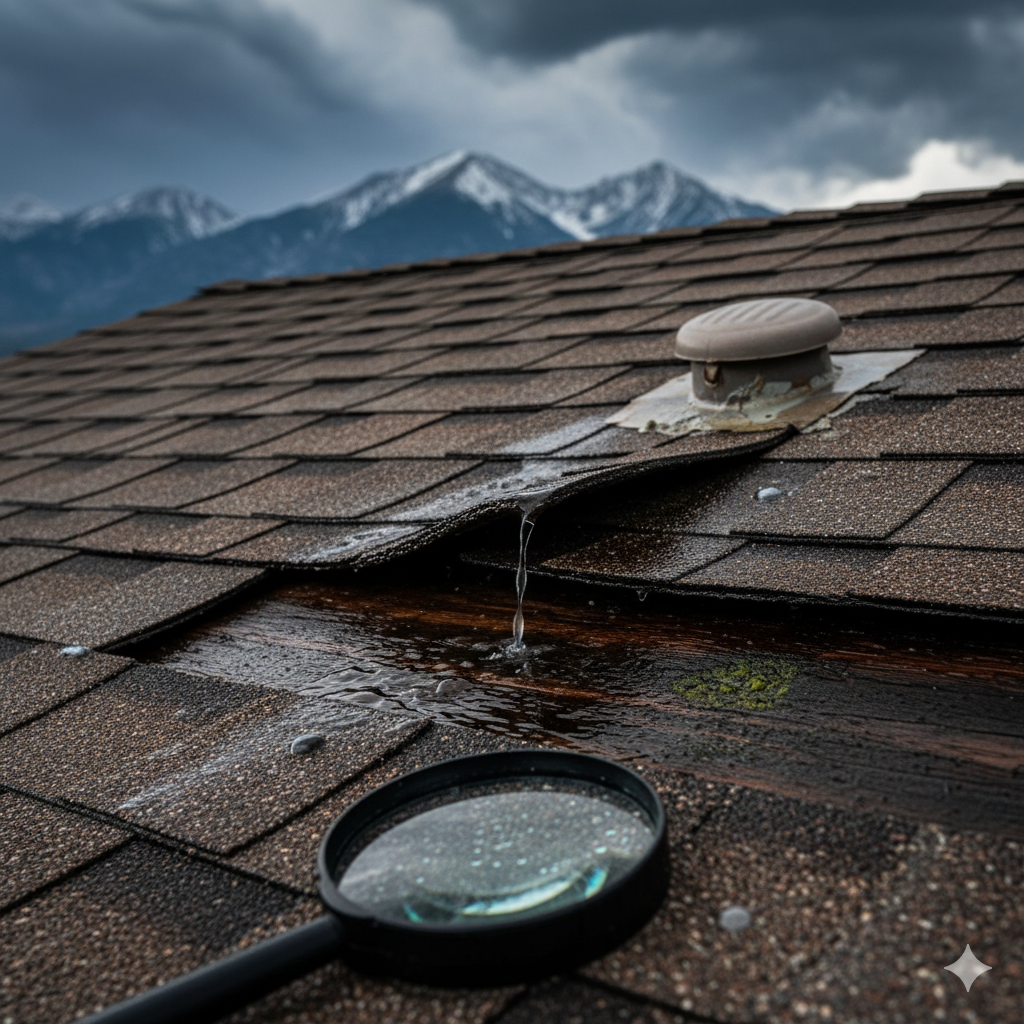
Hail Damage and Regional Risks
Northeastern Colorado sits in “Hail Alley,” averaging 7–9 hail days per year (NOAA, https://statesummaries.ncics.org/report_section/co/1/). The May 8, 2017 storm hammered roofs with stones over 2 inches across, resulting in more than $2 billion in insured losses. Common hail impacts include:
- Pockmarks or dents on shingle surfaces
- Granule deposits collecting in downspouts
- Dented gutters, drip edges, and metal flashing
Those small granule piles in your gutters aren’t just unsightly—they signal that your shingles’ protective topcoat has been stripped away, leaving spots vulnerable to UV damage and leaks.
Water-Related Damage from Rain, Standing Water, and Ice Dams
A clogged gutter or a low spot on your roof can trap water long enough to saturate the underlayment. Over time, this standing water can rot the roof deck beneath. Watch for interior clues, such as:
- Brown or yellow stains on ceilings and walls
- Peeling or blistering paint inside the attic
- Damp or compressed insulation
In colder months, melting snow refreezes at the eaves, forming ice dams that force water under shingles. Ice dams often announce themselves with water trails along rafters or puddles in the attic—red flags that demand immediate attention.
Debris Impact and Structural Concerns
Branches, patio furniture, and loose objects become roof-threatening projectiles in a storm. Even seemingly minor strikes can:
- Puncture roofing decking or underlayment
- Crack or split shingles
- Loosen or tear flashing around penetrations
Debris impacts sometimes leave only subtle scratches or small tears. If you spot any evidence—no matter how small—schedule a detailed inspection. Those tiny blemishes can widen with each rain and eventually lead to costly interior damage.
By understanding these four damage types, you’ll know exactly where to look and when to call in a professional. Early detection is the key to keeping repair costs down and preserving your roof’s integrity.
Prioritize Safety and Conduct an Initial Damage Assessment
When a storm leaves your roof in question, rushing onto the decking can turn a bad situation into a dangerous one. Starting with a safe, structured approach keeps you out of harm’s way while giving you the information you need to make the right call—whether that’s DIY patching or bringing in a pro.
An initial damage assessment helps you spot the most obvious issues and decide if you need immediate emergency repairs (like tarping) or can wait for a scheduled inspection. Follow the steps below to evaluate your roof safely, from standing on solid ground to peering into the attic.
Safety Precautions Before Inspection
Before any hands-on checking, gear up and plan for support:
- Wear slip-resistant footwear, sturdy gloves, and safety glasses or a helmet
- Position a reliable ladder on level, solid ground and secure it at the top
- Always have a second person acting as a spotter and holding the ladder
- Avoid climbing if the roof is wet, icy, or visibly sagging—observe from a safe distance instead
- Use binoculars or a zoom-capable camera to inspect high or hard-to-reach areas
Safety gear and proper planning reduce the risk of slips, falls, and other injuries. If you feel uncertain at any point, call a professional for a safer, more thorough evaluation.
Ground-Level Exterior Inspection
A perimeter walkaround can reveal a surprising amount:
- Note any missing, curled, or broken shingles along the roofline
- Look for displaced ridge caps or torn underlayment at hips and valleys
- Inspect gutters, downspouts, and drip edges for dents, granule buildup, or blockages
- Check soffits and overhangs for hail dents or debris accumulation
- Photograph each issue from multiple angles using a smartphone or camera
Don’t rush this step. Taking your time ensures you don’t overlook hidden trouble spots that could worsen in the next rain.
Attic and Interior Inspection
Once you’ve covered the outside, turn your attention indoors:
- Choose daytime and bring a bright flashlight into the attic
- Search for shafts of daylight shining through any roof penetrations
- Look for water trails along rafters, wet or compressed insulation, and mold spots
- Inspect ceilings beneath suspected damage for stains, peeling paint, or bulges
- Test light fixtures for moisture or dripping water
These interior clues often reveal leaks that haven’t yet shown up on the roof’s surface, giving you a head start on identifying problem areas.
Recording Initial Findings
Good documentation keeps your assessment organized and useful:
- Keep a dated log (notebook or digital) listing each inspection point and its condition
- Sketch a simple roof diagram, marking exact locations of visible damage
- Store all photos and videos in a dedicated folder—make sure file names reflect date and area
- Note weather conditions and any temporary fixes you apply (e.g., tarp installed)
- Include contact details for anyone who assists you or conducts a preliminary inspection
A clear, time-stamped record not only guides your repair strategy but also strengthens any future insurance claim or contractor estimate.
Document Damage Thoroughly for Insurance Claims
A well-documented record of your roof’s storm damage not only speeds up the insurance process but also maximizes your chances of a full payout. Insurance adjusters rely on clear, chronological evidence to evaluate claims, so taking the time now to capture every detail will pay dividends down the road. Below, we’ll walk through the key steps to build an airtight case—covering visuals, communication, professional assessments, and final claim submission.
Photographing and Videotaping All Damage
Start by capturing both the big picture and the fine print:
- Wide-angle shots of your entire roof from multiple vantage points to show overall condition.
- Close-ups of specific issues: hail dents, missing shingles, cracked flashing, standing water, and interior stains.
- Record video walkthroughs while narrating what you see (“Here at the northwest corner, two shingles are curled and the underlayment is exposed.”).
- Ensure every file carries a date-time stamp or contains metadata that proves when it was taken.
- Photograph ancillary damage too: dented gutters, clogged downspouts, attic leaks, and wall or ceiling stains.
These images become the core evidence for your insurance adjuster. Keep them organized in a single folder—either physically printed or sorted in a digital directory—so nothing gets overlooked.
Maintaining a Communication Log
Clear, consistent communication keeps everyone aligned and protects you against misunderstandings:
- After each call or email with your insurer, adjuster, or contractor, note the date, time, contact name, and a brief summary of the conversation.
- Save all written correspondence—letters, policy documents, emails—in one central file, labeled by date and subject (e.g., “2025-06-10_Adjuster_Smith_Estimate”).
- If your insurer requires specific forms or checklists, mark down when and how you submitted them.
- Record any follow-up tasks or promised callbacks, then check them off as they’re completed.
A transparent communication trail shows your insurer you’re organized and proactive, reducing back-and-forth delays and unanswered questions.
Obtaining Professional Inspection Reports
Homeowner observations are valuable, but a certified contractor’s report carries extra weight:
- Schedule a free roof assessment with a reputable, licensed roofing company—veteran-owned specialists like Semper Fi Restoration often offer complimentary inspections and deep local expertise.
- Ask for a written report that details every damaged area, includes recommended repair or replacement materials, and provides a line-item cost estimate.
- Request digital or printed copies of the contractor’s credentials (license number, insurance coverage) alongside their findings.
- If you use multiple contractors for bids, compare each report for consistency in damage descriptions and recommended solutions.
When you submit these professional findings to your insurance company, you’re demonstrating that the repair scope is realistic, necessary, and backed by industry standards.
Filing Your Insurance Claim
With photos, logs, and inspection reports in hand, you’re ready to file a comprehensive claim:
- Review your policy to confirm covered perils (wind, hail, debris, etc.) and deductible amounts.
- Complete any required claim forms, attaching your photographs, inspection report, and communication log.
- Clearly reference each document in your submission so the adjuster can cross-check evidence efficiently.
- If questions arise about the process, consult our guide on Insurance Claims Help for step-by-step support.
Promptly provide any additional information your insurer requests and keep copies of every submission. This disciplined approach not only accelerates your claim approval but also helps ensure you receive full compensation for storm-related repairs.
Estimate Repair Costs and Define Scope of Work
Before you sign off on any repairs, it’s crucial to understand how much you’re likely to spend and exactly what work needs to be done. A clear budget and scope of work protect you from sticker shock and ensure both you and your contractor share the same expectations. In this section, we’ll cover typical cost ranges, key factors that tilt the balance between repair and replacement, how to gather reliable bids, and the importance of budgeting for surprises.
Understanding Typical Cost Ranges
Roof repair pricing can vary widely depending on the extent of damage and materials used. According to HomeAdvisor, most minor repairs—such as replacing a few shingles or patching small leaks—fall between $392 and $1,929, with an average spend of about $1,152. On the other hand, more involved work, like replacing large sections of underlayment or addressing decking rot, can climb as high as $8,000, especially if you opt for premium shingles or need structural reinforcement.
Factors Influencing Repair vs. Replacement
Several variables determine whether you’re looking at a quick repair or a full-scale reroof:
- Roof age: Once a roof passes the 15–20-year mark, hidden wear and older decking often push the decision toward replacement.
- Damage extent: A single damaged shingle rarely warrants a total redo, but widespread curling, granule loss, or decking deterioration usually does.
- Material choice: Architectural shingles or metal roofing cost more upfront than basic 3-tab shingles, but they often deliver longer lifespans and better storm resistance.
Getting Multiple Quotes from Contractors
Don’t settle for the first estimate that comes your way. Instead:
- Secure at least three written bids from licensed roofing pros.
- Verify that each quote breaks out labor, materials, permits, and cleanup costs.
- Compare not just price, but also timelines, warranty offerings, and payment schedules.
This side-by-side approach uncovers unusually low or high bids and helps you pick a contractor who balances cost with quality and reliability.
Budgeting for Unexpected Expenses
Even the best visual inspections can miss hidden issues—rot beneath the surface, unseen underlayment damage, or framing repairs. To avoid scrambling for cash halfway through the job:
- Set aside a contingency fund equal to 10–20% of the total project estimate.
- Keep accessible funds—whether cash or a line of credit—so urgent repairs don’t delay the job.
- Ask your contractor about common “hidden” fixes in your area (high-wind zones, ice dam seals, etc.) and build those into your preliminary budget.
By planning ahead and defining the scope of work in detail, you’ll move through the repair process with confidence, knowing there are no unwelcome surprises at the finish line.
Implement Temporary Fixes to Mitigate Further Damage
Even if you can’t complete a full repair right away, quick, safe measures can keep a minor leak from turning into major interior damage. Temporary fixes also buy time to schedule permanent work with a trusted contractor. The steps below focus on stabilizing your roof and protecting your home until professional crews arrive.
Proper Tarp Installation Techniques
A well-secured tarp is one of the most effective short-term shields against rain and wind. First, choose a heavy-duty, UV-resistant tarp that extends at least four feet beyond the damaged area in every direction. Position the tarp so that the water runs over intact shingles, not under them. Avoid nailing through the tarp—those holes become new entry points. Instead, secure the edges with roof straps, sandbags, or battens screwed into the decking beneath the felt. Work from the bottom up: anchor the lower edge first, then smooth the tarp and fasten the top edge to create a tight, shed-like slope.
Clearing Debris and Ensuring Proper Drainage
Storm debris and clogged gutters are often the culprits behind standing water and leaks. Gently sweep branches, leaves, and loose shingle fragments off the roof using a soft-bristled broom or a roof rake from the ground. Next, flush gutters and downspouts with a garden hose to confirm water flows freely. If you spot blockages, clear them by hand (wear gloves) or with a plumber’s snake for tougher clogs. Proper drainage prevents water from pooling on the roof surface or backing up under the shingles.
Boarding Up and Protecting Openings
Broken skylights, vents, or chimney flashings should never be left exposed. Measure each opening and cut ½-inch exterior-grade plywood to overlap it by at least two inches on all sides. Fasten the board directly to the roof deck with screws or special clip systems designed for quick attachment. Seal the plywood edges with roofing tape or caulk to further discourage water infiltration. This approach keeps out rain and pests while you arrange permanent replacement parts.
When to Call for Emergency Professional Support
Some situations demand more than a DIY patch. If water is pouring through multiple leaks, ceiling fixtures are dripping, or you spot large sections of roofing material missing, call a licensed roofing professional immediately. Rapid tarp installation or emergency boarding by skilled crews can prevent structural damage and mold growth. Never attempt to tackle extensive tarping on a windy or unstable roof—leave those high-risk jobs to experts equipped with the right safety gear and training.
Select and Vet a Qualified Roofing Contractor
Choosing the right contractor can mean the difference between a sturdy, storm-ready roof and a string of repairs that never seem to end. A thorough vetting process protects you from fly-by-night operators and ensures you have a team that understands Colorado’s unique storm risks. Use the following checklist to narrow the field and zero in on a professional you can trust.
Verifying Licenses, Insurance, and Certifications
Before anyone sets foot on your roof, confirm they hold the proper credentials:
- Ask to see their state or local roofing license and note the license number.
- Request proof of liability insurance and workers’ compensation coverage—this shields you if a worker is hurt or property is damaged.
- Look for industry certifications, such as those from shingle manufacturers or trade associations, which signal ongoing training and adherence to best practices.
Never accept a verbal claim of coverage—get it in writing. A licensed, insured contractor aligns with local building codes and gives you recourse if something goes sideways.
Evaluating Storm Damage Specialization
Not all roofing companies have experience with Colorado’s hail, wind, and sudden snowmelt. To find a storm-savvy crew:
- Review their portfolio for before-and-after photos of storm repair projects.
- Ask about specific solutions they’ve used for hail dents, ice dams, or wind-uplift issues.
- Check online reviews and local references to hear how they handled insurance claims and emergency fixes.
A specialist who knows how to document storm damage and coordinate with insurance adjusters will streamline your repair process.
FORTIFIED Roofing Contractors and Best Practices
The Insurance Institute for Business & Home Safety (IBHS) created the FORTIFIED program to raise the bar on resilience. Contractors trained in these standards:
- Follow upgraded fastening schedules and underlayment requirements designed to resist hail and uplift.
- Install impact-resistant shingles rated “Good” or “Excellent” under UL 2218 testing.
- Use details like reinforced drip edges and secondary water barriers at eaves and valleys.
Learn more about the updated resilient construction standards on the IBHS website.
Seek Veteran-Owned Experts
Veteran-owned businesses often bring a heightened sense of discipline, integrity, and precision to every job. Working with a team like Semper Fi Restoration means you benefit from:
- Military-inspired project management that keeps timelines and budgets on track.
- Transparent communication at every step, from free roof assessments to final cleanup.
- A commitment to quality and community—supporting veterans while safeguarding your home.
Discover how our values guide each restoration at Semper Fi Restoration’s About Us page.
Choose Durable, Storm-Resistant Roofing Materials
When you’re rebuilding or repairing after a storm, selecting the right materials can mean the difference between a one-off fix and a roof that stands strong through hail, wind, and heavy snowmelt. In this section, we’ll explore four key components—shingles, underlayment and ventilation, gutters and flashing, plus ice and water barriers—to help you assemble a system designed for Colorado’s toughest weather.
Impact-Resistant Shingle Options
Not all shingles are created equal when it comes to hail and wind. UL 2218 Class 4 impact-resistant shingles have passed the most rigorous hail test, and they’re your best defense against golf-ball-sized chunks of ice. Here’s how to compare:
• Standard asphalt shingles: the most budget-friendly choice, with warranties typically around 20–25 years, but limited hail protection.
• Architectural (laminate) shingles: thicker, multi-layered profiles that resist wind uplift better than 3-tab options. Warranties range from 30–50 years.
• UL 2218 Class 4 shingles: often carry a 10–25% premium over standard architectural shingles, but come with extended hail-damage coverage—some manufacturers back these with 50-year warranties and hail-forgiving warranties.
Popular models include Owens Corning’s Duration® Storm Protection (with SureNail® Technology) and GAF’s Timberline® AS II SBS Modified IR shingles. When pricing bids, ask contractors to break out the premium for Class 4 products so you know exactly what you’re paying for extra peace of mind.
Upgraded Underlayment and Ventilation Systems
Beneath every reliable roof covering lies a moisture barrier and a proper airflow strategy. Traditional felt underlayment offers basic protection, but synthetic underlayment delivers:
• Superior tear strength—up to twice that of felt.
• Better water shedding and UV resistance during installation delays.
• A more consistent waterproof layer that won’t wrinkle or crack.
Ventilation is the partner to underlayment. A balanced combination of soffit (intake) vents and ridge (exhaust) vents prevents heat and moisture buildup in the attic, cutting down on ice-dam formation. As a rule of thumb, allow at least 1 square foot of net free vent area for every 150 square feet of attic space. Good airflow keeps snowmelt moving off the roof instead of refreezing at the eaves.
Seamless Gutter and Flashing Choices
Once water runs off your roof, you want it directed safely away from your home. Seamless aluminum gutters, custom-measured on site, minimize joint leaks and reduce maintenance. Pair these with downspouts sized to handle Colorado’s sudden deluges—3×4” or 4×5” profiles are common.
Flashing is your first line of defense at valleys, chimneys, skylights, and vents. Consider:
• Copper flashing: durable, corrosion-resistant, and ideal for key transitions.
• Stainless steel flashing: highly resistant to rust and a lower-cost alternative to copper.
• Reinforced drip edges: galvanized steel or PVC drip edges help maintain a watertight seal along eaves and rakes.
Well-installed, quality flashing prevents those sneaky leaks that show up months after a storm.
Additional Protective Measures: Ice and Water Barriers
Ice dams and wind-driven rain exploit any tiny gap under your shingles. Self-adhesive ice and water barriers—also called peel-and-stick membranes—form an impermeable layer where you need it most:
• Eaves: stops meltwater from refreezing under the lowest shingles.
• Valleys: channels water down the roof without saturating the deck.
• Chimneys, plumbing stacks, and skylights: seals around protrusions to keep wind-blown moisture at bay.
By specifying a 36″-wide barrier at eaves and full-length coverage in valleys, you build a second line of defense that catches water before it reaches your home’s interior.
Choosing the right combination of impact-resistant shingles, high-performance underlayment, seamless gutters, solid flashing, and targeted ice and water barriers will give your roof the toolkit it needs to shrug off hail, wind, and snow. With materials as tough as Colorado’s storms, you’ll sleep easier knowing your home is built to last.
Understand the Repair and Replacement Process
Knowing what happens from the moment a contractor arrives to the final nail sweep takes the guesswork out of roof repairs and replacements. Whether you’re patching a few shingles or opting for a full tear‐off and re‐roof, each phase has its own checklist of tasks, materials, and protective measures. This section breaks down the workflow step by step so you can track progress, ask informed questions, and rest easy that your home—and your investment—are in capable hands.
Site Preparation and Protection Measures
Before any shingle is lifted or nail is driven, your contractor should set up a secure work zone. Typical preparation includes:
- Laying down roof protection mats along walkways and landscaping to catch dropped debris
- Covering vehicles, bushes, and flower beds with tarps or plywood shields
- Erecting a debris chute or sealed dumpster close to the house for safe disposal of old materials
- Installing plywood or temporary fencing along property lines to keep nails and scraps contained
These measures safeguard your yard, driveway, and neighboring properties from unexpected damage. A well‐prepared site also lets crews move more efficiently, keeping cleanup time—and your overall cost—lower.
Techniques for Common Repair Tasks
When only a section of your roof needs attention, targeted repairs can restore integrity without a full replacement. Two of the most frequent fixes are:
Shingle Replacement
- Remove damaged shingles by lifting the sealant strip and pulling out the nails.
- Slide a new shingle into place, align the seal strip with adjacent shingles, and nail it down in the factory‐recommended pattern (usually four nails for 3-tab shingles, six or more for architectural laminates).
- Press the sealant tab firmly, ensuring a watertight bond.
Flashing Resealing and Patching
- Clean around the existing flashing with a wire brush to remove debris and old caulk.
- Apply a high‐quality roofing cement under the flashing edges, then press it back into position.
- For cracks or punctures, use a copper or stainless‐steel patch cut slightly larger than the defect, sealed on all sides with roof cement or tape.
Attention to these details prevents minor trouble spots from turning into major leaks.
Full Roof Replacement Workflow
A complete replacement involves a more extensive sequence of steps. Here’s a bird’s‐eye view:
-
Tear‐Off
- Strip away old shingles, underlayment, and any damaged decking.
- Inspect the roof deck for rot or warping; replace sheathing panels as needed.
- Sweep or vacuum the exposed deck to remove nails and debris.
-
Underlayment and Edge Details
- Install a synthetic underlayment across the entire deck for a uniform water barrier.
- Add self‐adhesive ice and water shield along eaves, valleys, and around penetrations.
- Fit metal drip edges at eaves and rakes to direct water into gutters.
-
Shingle Installation
- Lay starter shingles along eaves to create a secure first row.
- Position field (main) shingles in staggered courses, maintaining proper exposure.
- Cap ridges and hips with specially designed ridge cap shingles or preformed caps.
-
Flashing and Penetrations
- Flash chimneys, skylights, and plumbing vents with step flashing or custom‐bent metal.
- Seal all transition points with compatible roofing sealant.
Quality Control and Post-Work Cleanup
Once the new roof is in place, a final inspection and tidy‐up are essential:
- Conduct a nail sweep using a magnetic tool across the yard, driveway, and job site
- Remove all tarps, mats, and portable dumpsters, ensuring no debris remains on the property
- Use leaf blowers to clear gutters, soffits, and rooftop surfaces of stray granules
- Perform a detailed walk‐through with the homeowner, reviewing workmanship, warranty details, and maintenance tips
A contractor’s commitment to thorough cleanup and a transparent quality‐check cements the trust you place in their work—and wraps up a storm damage repair job on a high note.
Conduct Final Inspection and Confirm Quality
Before the final payment is released, it’s essential to verify that every element of the repair or replacement meets industry standards and your expectations. A structured walkthrough not only identifies any remaining issues but also ensures you’re fully protected by warranties and that your insurance claim aligns with the completed work. Follow the steps below to close out your project with confidence.
Walk-Through Inspection Checklist
Use this printable checklist to guide your final inspection:
- Shingle alignment and seal: Confirm that shingles lie flat in straight, uniform rows and that seal strips are fully bonded.
- Flashing and penetrations: Inspect flashing around chimneys, vents, and skylights for tight seams and proper sealing—no gaps or loose edges.
- Gutter and downspout placement: Ensure gutters are securely fastened, free of debris, and angled correctly to carry water away from your foundation.
- Ridge and hip caps: Verify that ridge cap shingles are installed with consistent overlap and secure nailing per manufacturer specs.
- Ventilation performance: Check soffit and ridge vents for clear airflow—look for daylight exposure or feel for a light breeze in the attic.
- Ice and water barrier integrity: Make sure self-adhesive membranes at eaves, valleys, and around penetrations remain fully adhered with no exposed edges.
- Site cleanup: Conduct a thorough nail sweep of your yard, driveway, and landscaping. Confirm the contractor has removed all debris and performed a magnetic sweep for stray nails.
Completing this checklist prevents small oversights and gives you peace of mind that the job is truly done.
Confirming Warranty Terms and Documentation
A robust warranty package protects your investment long after the crew has left town. Before signing off:
- Manufacturer warranties: Obtain written warranty certificates for shingles, underlayment, flashing, and any other materials, noting their durations and coverages.
- Workmanship warranty: Secure a clear, written guarantee from your contractor that outlines the scope (installation defects, leaks) and the warranty period.
- Claim procedures: Understand the process for filing warranty claims—who to contact, required documents (photos, invoices), and expected response times.
- Document storage: Keep all warranty paperwork in a dedicated folder—digital backups and printed copies both housed in a safe, accessible location.
Having these documents organized ensures you can quickly address any future issues without confusion or delay.
Coordinating with Insurance Adjuster for Final Approval
If your repair was supported by an insurance claim, the adjuster may need to revisit the site:
- Schedule the visit: Arrange a time when both you and your contractor can walk through the completed work alongside the adjuster.
- Present your checklist: Use your inspection notes to guide the discussion, confirming that each repaired or replaced element aligns with the original claim.
- Address questions on the spot: Have your contractor ready to supply additional photos, measurements, or warranty details if the adjuster requests more information.
- Document any punch-list items: If the adjuster identifies unfinished tasks, record them in writing and set a firm timeline for those final fixes before releasing any remaining funds.
Bringing your contractor into this conversation streamlines approval and ensures everyone agrees on the work’s completeness.
By methodically inspecting the finished roof, securing all warranty documentation, and collaborating with your insurance adjuster, you’ll close out the project on solid footing. Your roof will be ready to weather Colorado’s next storm—and you’ll have the confidence that every shingle, seal, and seam is built to last.
Plan Ongoing Maintenance for Long-Term Protection
Routine upkeep transforms a freshly repaired roof into a durable, storm-ready shield. Instead of waiting for the next big blow, a proactive maintenance schedule will catch small concerns before they grow into costly repairs. The following best practices will help you keep your roof in peak condition year after year.
Scheduling Regular Roof Inspections
Aim for two professional inspections each year—once in spring and again in fall. A licensed roofer will spot early signs of wear, from tiny sealant cracks to granule loss, long before you notice leaks inside. Between those appointments, perform a quick monthly walkaround from ground level. Look for curled or missing shingles, dents after windy days, and sagging gutters. Jot down any issues so your contractor can tackle them on their next visit.
Seasonal Maintenance Best Practices
Each season brings its own challenges. In spring and early summer, clear gutters and downspouts of winter debris—leaves, pine needles, and loose shingle granules—to ensure rainwater can drain freely. Before winter sets in, trim tree limbs at least six feet from your home; overhanging branches can abrade shingles or collapse under snow. A little yardwork now prevents leaks and storm damage later.
Addressing Minor Issues Early
Never ignore a small drip or a lone missing shingle. Applying roofing sealant to hairline cracks or swapping out a single shingle can stop a minor imperfection from becoming a major leak. Keep gutter guards clear so standing water doesn’t back up under your shingles. Tackling minor repairs—yourself or through a quick contractor call—builds resilience into the entire roofing system.
Considering Future Upgrades for Climate Resilience
If hail or high winds are a recurring nuisance, plan ahead for a materials upgrade. Metal roofing, reinforced composite shingles, or UL 2218 Class 4 impact-resistant products offer longer lifespans and superior storm protection. And if you’re considering solar panels, coordinate their mounts with your roofing system now to maintain waterproof integrity. By evaluating these enhancements before damage strikes, you’ll ensure your roof is ready for whatever Colorado’s weather throws its way.
Securing Your Home's Future After a Storm
Recovering from a storm is more than just fixing visible damage—it’s about building resilience into your home so that the next hailstorm, high‐wind event, or sudden thaws won’t leave you scrambling. You’ve identified and documented damage, worked through temporary measures, secured insurance approval, and completed permanent repairs. Now it’s time for the final piece: turning this experience into long‐term protection.
Here’s a quick recap of the journey you’ve taken and the actions that will keep your roof—and your peace of mind—in top shape:
- Damage Identification: You learned to spot wind-lifted shingles, hail dents, ice dams, and debris impacts before they led to leaks.
- Thorough Documentation: Every photo, video, inspection report, and communication log bolstered your insurance claim and contractor bids.
- Emergency Stabilization: Proper tarp installation, debris clearing, and boarding up prevented further interior harm.
- Contractor Selection & Repairs: Armed with multiple quotes, certifications, and veteran-owned values, you chose a qualified team to install impact-resistant shingles, underlayment, and flashing.
- Quality Assurance & Maintenance: A final walk-through checked seal integrity, warranties were secured in writing, and a seasonal upkeep plan was established.
By following each step methodically, you didn’t just restore your roof—you elevated its ability to withstand Colorado’s unpredictable weather patterns. But roofs age, materials shift, and storms will come again. That’s why proactive maintenance—regular inspections, gutter cleanouts, and timely small repairs—remains essential.
Ready to lock in your home’s defense against the next storm? As a veteran-owned business rooted in Marine Corps values of integrity, precision, and efficiency, Semper Fi Restoration stands by your side from the first hail strike to years of reliable performance.
Schedule your free roof assessment and consultation
today, and let us help you protect your greatest investment—your home.

New Paragraph
We'd love to do a complimentary roofing assessment for you!